Interfacing Arduino, Adafruit 7" TFT Touchscreen, and RA8875 Screen Driver
- Project definition
- Wiring the RA8875 & Arduino
- Code to get the screen to work
- RA8875 library syntax
- SPI problems with SD card planning
Project definition
It’s my second semester here at college, and this time we’ve been assigned a project with the Arduino.
The project this semester is themed, and our theme isn’t the greatest but we can work with it! The theme this semester is smart baby or kid products. My team and I came up with the idea of a chore/task tracker, for if a parent wants the kid to be able to keep track of their chores or things they need to do, as well as teach them organizational skills.
We came up with the idea of a small touchscreen interface with a cool GUI, buttons on the bottom for each child, and up the side of the module for each day.
We decided on using the Adafruit 7” TFT Touchscreen with the RA8875 driver board as the main components of our design.
Wiring the RA8875 & Arduino
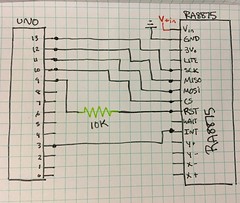
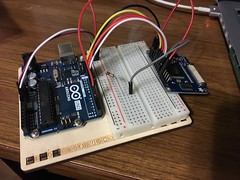
To find the wiring between an Arduino UNO and the RA8875 took me a while, but I got it.

| Device: | Arduino UNO | RA8875 |
|---|---|---|
| Pin: | 13 | SCK |
| 12 | MISO | |
| 11 | MOSI | |
| 10 | CS | |
| 9 (w/ resistor) | RST | |
| 3 | INT |

Code to get the screen to work
To get the initial setup working, we used an example from the Adafruit RA8875 library.
We modified the code a little bit before the end of the setup, with this:
tft.graphicsMode(); // tells the RA8875 we're starting to draw pictures instead of display words

// Make a rectangle
tft.fillRect(20, 200, 200, 200, RA8875_CYAN);
/*
* makes a rectangle/square starting:
*  20 pixes from the left side of the screen (xi)
*  200 pixels from the top of the screen (yi)
*  200 pixels to the right (xf)
*  200 pixels down (yf)
*/

delay(1000);
for (int x = 0; x < 100; x++) {
	tft.fillRect(250, 200, 10+x*3, 200, RA8875_RED);
	delay(10);
}
// which slowly draws a rectangle across the screen
RA8875 library syntax
In the Adafruit RA8875 library, you can find the header file here: https://github.com/adafruit/Adafruit_RA8875/blob/master/Adafruit_RA8875.h
And it lists every function available for use and the arguments needed for each when called. I’ll be using this to draft a GUI for the touchscreen soon.
SPI problems with SD card planning
Because our program is so diverse, we need the arduino’s memory to mainly hold all the information for the GUI, which’ll likely take up the majority of the space and not leave much room for the data to be used and organized within the GUI, like the chores, child profiles, and more.
To fix this, we decided to go with an external storage system–an SD card. The only problem with implementing that is that the touchscreen uses the SPI (serial peripheral interface), as does the microSD card reader. This poses a master/slave coding issue, but I think what we can do is wire it up as two SPI devices, and say, load all the data into the Arduino’s RAM before initializing the touchscreen, and writing it all before shutting the touchscreen down. That way there’s no access to the SD card while the touchscreen is on, (preventing the issue of turning the touchscreen off to initialize the SD card, get the data, and re-turn the touchscreen on again.)
It’s a bit of a work in progress, but I believe we’re on the right track :)
Until next time!
{thallia}
