
thallia
Syncthing
Introduction
A few weeks ago I attended an unconvention called Barcamp. Barcamp is a neat conference like gathering that is often focused on technology, programming, and engineering. The people who attend give talks of their own, instead of the organizers bringing in professionals to come and talk, which creates a fun community of learning and sharing what you know with your peers. A group of nerd friends and I went to the most recent one, and we sat in on a talk about Linux command line tools.
One of the tools that caught my eye was a tool called Syncthing, which is a syncing service between your two computers: but it’s completely decentralized and gets rid of the need for proprietary cloud services. When you set it up, everything can be done via a web-GUI, it’s portable on multiple different OSs (Windows, MacOS, FreeBSD, Ubuntu, OpenBSD, Solaris, you name it).
The documentation can be found here.
Install
If you have the snap package manager on Ubuntu(or any other linux distro that supports snap), you can easily install Syncthing with sudo snap install syncthing.
For other operating systems you can go here to find the install instructions.
Setting up
The documentation tutorial can be found here: https://docs.syncthing.net/intro/getting-started.html
When you run syncthing for the first time (I ran it in the command line to see what the output would be) you get an output like this:

Then your default browser will pop up and give you a screen like this:
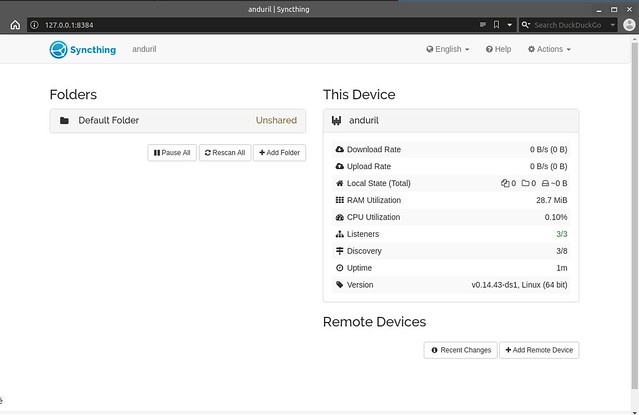
If it doesn’t, you’re able to go to this link in your browser, http://localhost:8384/, and if syncthing is running it should come up.
On the right is the current device that you’re syncing, and on the left is the default sync folder that was created, which you’ll find in your home directory. Because it’s not shared yet, it has the label “Unshared” next to it.
You’re going to want to follow the same steps on your other computer to allow for the next step to be able to happen.
Adding the 2nd Device
Once the above is completed on the two (or 3, or 4, or 5…I’ll stop) computers you want to sync between, go ahead and click on Add Remote Device in the bottom right corner of the web GUI and you’ll be presented with this screen:

If you’re on the same network, syncthing will automatically recognize the other device’s code that is running syncthing, and you can click on that device ID to automatically fill out that entry. Otherwise, you’ll have to go to Actions in the top right corner, click on Device ID, and copy and paste that into the computer you want to add that other device to.
Repeat this process on the other computer so that you’ve added each device onto each other’s syncthing.
After that, you will get a few notifications in a minute that’ll ask if you want to share the default folder, click ‘yes’, and the status’s of both computers should say that they’re Up to Date! Now you can start adding files, and watch as they sync to both computers.
Other Configurations
This just touches the surface of what syncthing can do. In this documentation is a bunch more advanced options you can use, such as Send-Only and Receive-Only files between computers, reverse proxy, descriptions of how the security works, command line operation, firewalls, SSH tunneling, and more.
Have fun setting up a secure and effective syncing system!
{thallia}
P.S. Feel free to join the thallia’s tree Discord server, a fun and engaging place where we discuss tools like this, troubleshoot things, and talk about tech. :)